Think of git reflog as a disaster recovery system for your repository. You won’t use it often, but it’s a big time saver when you do.
Most days, you’ll work with Git without a hitch. But sooner or later, you’ll hit a snag. Messed up a merge? Accidentally deleted a branch? Git reflog can help you recover these seemingly disastrous changes.
Unlike most Git commands that work with commit history, reflog records every change to your branch tips and other references. Every commit, reset, and checkout are all there.
This article will explain git reflog practically and demonstrate how it can prevent work loss due to common Git mishaps.
Table of Contents
- Setting up a sample repository
- Common destructive Git operations
- Real-world recovery use-cases
- Conclusion
Setting up a sample repository
To understand reflog, let’s set up a sample repository.
We’ll create a new directory, initialize a Git repository, and add a few commits. This will simulate a typical workflow and give us a base on which to work.
First, we’ll create a new directory and initialize a Git repository:
mkdir git-reflog-demo
cd git-reflog-demo
git init --initial-branch=mainNow, let’s add some initial commits:
echo "Initial content" > file1.txt
git add file1.txt
git commit -m "Initial commit"

echo "Second line" >> file1.txt
git commit -am "Add second line"

echo "Third line" >> file1.txt
git commit -am "Add third line"This creates a simple repository with three commits. Each commit adds a new line to file1.txt.
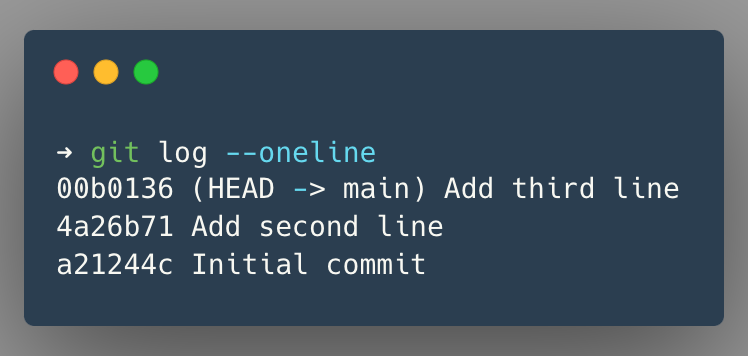
You can check your commit history with:
git log --onelineYou’ll see three commits, each with a unique hash.
This setup gives us a bare repository with which to work. We’ll use it to explore reflog and recover from common Git mishaps.
Common destructive Git operations
Git commands like hard reset, branch deletion, and interactive rebase are part of the standard Git toolkit. These operations can alter commit history, sometimes unintentionally.
Here are some operations that can modify your Git history:
- Hard reset
- Branch deletion
- Commit amending
- Interactive rebase
- Accidental merge
- Stash dropping
In the following sections, we’ll examine how these operations can lead to unexpected changes in your repository. We’ll then show how to use git reflog to restore your previous state.
Remember, reflog is local to your repository. It won’t help recover changes that were never in your local repo.
Below given examples will use the sample repository we set up earlier, simulating scenarios you might encounter in your daily work.
Real-world recovery use-cases
Recovering from a Hard Reset
A hard reset (git reset --hard) moves the current branch tip to a specified commit, discarding all changes after that point. It’s often used to undo commits but can lead to unintended loss of work.
Let’s simulate a hard reset gone wrong.
# Add a new commit
echo "Fourth line" >> file1.txt
git commit -am "Add fourth line"

# check the file content
cat file1.txt

# check git log
git log --oneline

# Hard reset to the previous commit
git reset --hard HEAD~1

# check git log again
git log --oneline

# check the file content
cat file1.txtWe’ve lost our “Add fourth line” commit.
Now, let’s say you realize that doing that reset was a mistake. Perhaps that commit contained a code block for a bug fix you’re working on. You need that code back.
Let’s see how to use reflog in this use case.
To see what happened after that reset, execute:
git reflogYou’ll see an entry like:
00b0136 (HEAD -> main) HEAD@{0}: reset: moving to HEAD~1
072069d HEAD@{1}: commit: Add fourth line
00b0136 (HEAD -> main) HEAD@{2}: commit: Add third line
4a26b71 HEAD@{3}: commit: Add second line
a21244c HEAD@{4}: commit (initial): Initial commitreflog shows a list of all recent ref updates (committing, merging, checking out branches, etc.) in your repository.
Each entry includes:
- A short SHA-1 hash
- The ref’s position relative to HEAD (
HEAD@{0},HEAD@{1}, etc.) - The action that caused the update
- The commit message
Now, to find our lost commit:
- Look for the commit message we added while committing before a reset – “Add fourth line”
- Note the corresponding SHA-1 hash (for me, its
072069d, it will be different on your side .)
You can get more details about this commit:
# using SHA-1
git show 072069d

# OR

# using ref's position relative to HEAD
git show HEAD@{1}Once you’ve confirmed this is the commit you want, recover it with:
# using the commit hash
git reset --hard 072069d

# OR

# using the reflog syntax
git reset --hard HEAD@{1}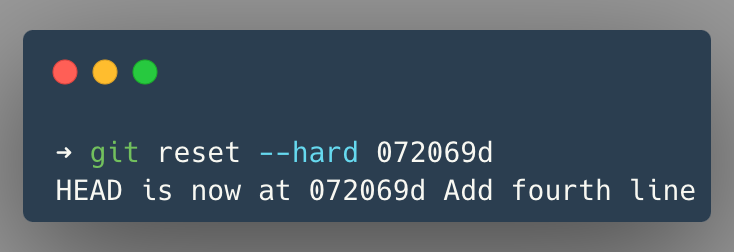
After running either of the above commands, your repository state will change:
- The HEAD pointer and your current branch will move to the recovered commit.
- Your working directory will be updated to match the state of this commit.
To verify the recovery:
git log --onelineYou should see the “Add fourth line” commit at the top of your log again.
Check the contents of your file:
cat file1.txtYou’ll see the fourth line has been restored.
Your reflog will also update, showing this recovery operation:
git reflogYou’ll see a new entry at the top, something like:
072069d (HEAD -> main) HEAD@{0}: reset: moving to 072069dA point to note is that this recovery process doesn’t create new commits. Instead, it moves your branch pointer back to the desired commit, effectively “undoing” the hard reset.
This technique works because the commit still existed in your repository’s history, even though it wasn’t reachable through standard Git commands after the hard reset.
Next, we’ll examine how reflog can help with a more complex scenario: recovering a deleted branch.
Recovering a Deleted Branch
Branch deletion in Git removes the branch pointer, making commits unreachable if they’re not part of another branch. This can be problematic if you delete a branch by mistake.
Let’s simulate accidentally deleting a branch:
# Create and switch to a new branch
git checkout -b feature-branch

# Add a commit to the new branch
echo "Feature branch commit" >> feature.txt
git add feature.txt
git commit -m "Add feature implementation"

# Switch back to main branch
git checkout main

# Accidentally delete the feature branch
git branch -D feature-branch

# Verify the branch is gone
git branch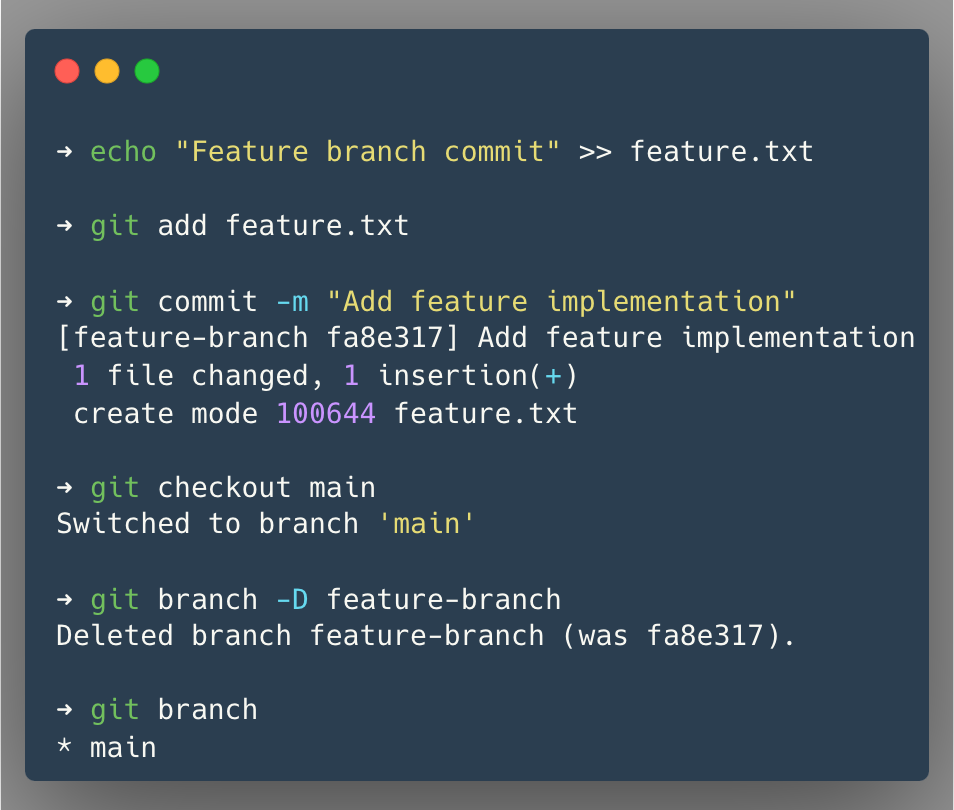
Now, let’s say you realize you’ve just deleted the branch containing your entire feature implementation. You need to recover it. Here’s how to use reflog in this scenario:
git reflogYou’ll see entries like:
072069d (HEAD -> main) HEAD@{0}: checkout: moving from feature-branch to main
fa8e317 HEAD@{1}: commit: Add feature implementation
072069d (HEAD -> main) HEAD@{2}: checkout: moving from main to feature-branch
072069d (HEAD -> main) HEAD@{3}: reset: moving to 072069d
00b0136 HEAD@{4}: reset: moving to HEAD~1
072069d (HEAD -> main) HEAD@{5}: commit: Add fourth lineTo find our lost branch commit:
- Look for the last commit on the deleted feature branch with the message “Add feature implementation”.
- Note the corresponding SHA-1 hash (in this case,
fa8e317)
You can verify the commit contents:
git show fa8e317Now, to recover the branch:
git checkout -b feature-branch-recovered fa8e317This creates a new branch at the commit, where our old branch was.
To verify the recovery:
# List branches
git branch

# Check the log of the recovered branch
git log feature-branch-recovered --oneline

# Check the contents of the feature file
cat feature.txtYour reflog will update to show this recovery operation:
git reflogYou’ll see a new entry at the top, like:
fa8e317 (HEAD -> feature-branch-recovered) HEAD@{0}: checkout: moving from main to feature-branch-recoveredThis recovery process creates a new branch pointer at the desired commit. The original branch name is gone, but all the commits are intact.
Excellent. One more day saved.
In the next section, we’ll explore how reflog can help recover from a mistaken commit amend operation.
Recovering from a Mistaken Commit Amend
Git’s commit --amend feature allows you to modify the most recent commit. However, using it incorrectly can lead to unintended loss of committed content.
Let’s simulate a scenario where we mistakenly amend a commit:
# Let's switch back to main branch
git switch main

# Add a commit with important changes
echo "Critical bug fix" >> bugfix.txt
git add bugfix.txt
git commit -m "Fix critical bug in login system"

# Check the log
# -n -> Limits the log messages to given number
git log -n 1 --oneline

# Oops! We realize we forgot to add a comment. Let's amend the commit
echo "# This fix addresses CVE-2023-12345" >> bugfix.txt
git add bugfix.txt
git commit --amend -m "Add comment to critical bug fix"

# Check the log
git log -n 1 --oneline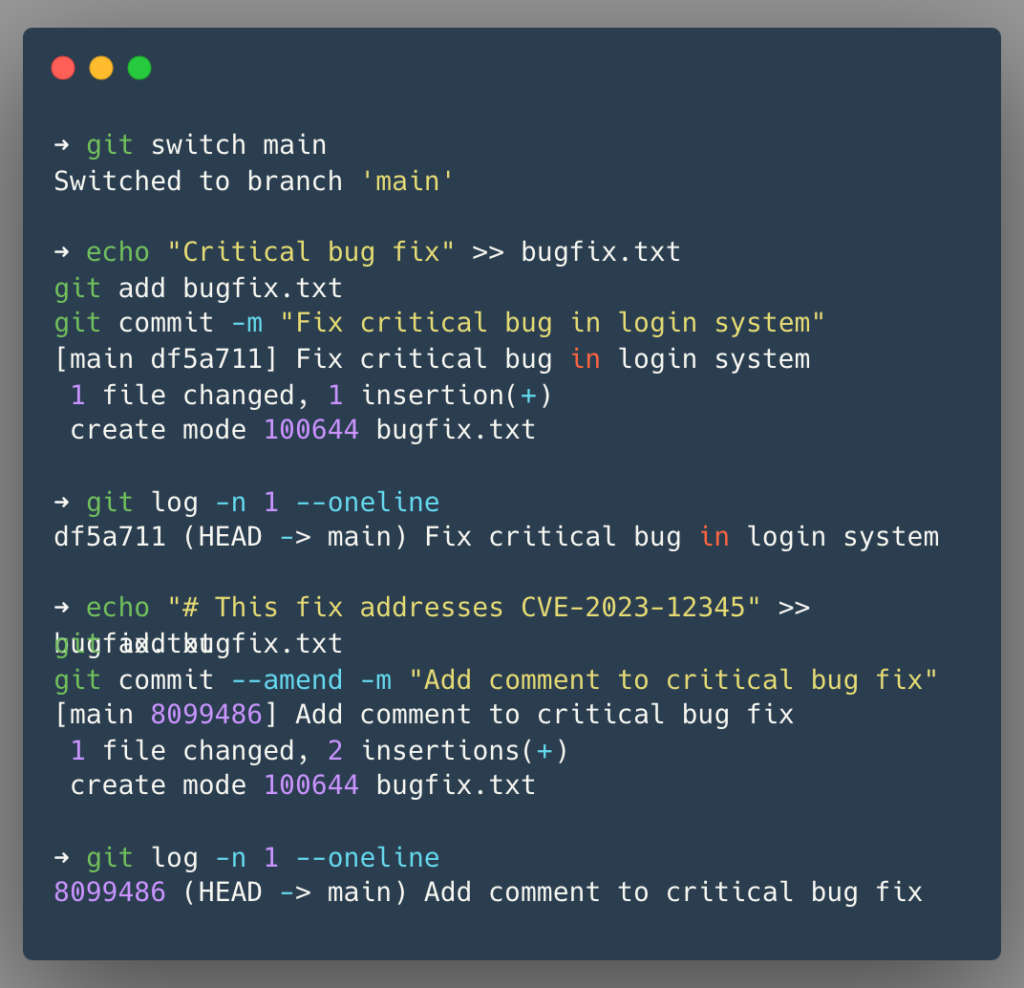
Let’s say you realize that the original commit message was necessary for your team’s tracking system, and the added comment wasn’t as important as you thought. You need to recover the original commit.
Here’s how to use reflog in this scenario:
git reflogYou’ll get entries like:
8099486 (HEAD -> main) HEAD@{0}: commit (amend): Add comment to critical bug fix
df5a711 HEAD@{1}: commit: Fix critical bug in login systemTo find our original commit:
- Look for the commit message (before
commit (amend)) “Fix critical bug in login system” - Note the corresponding SHA-1 hash (in this case,
df5a711)
You can verify the commit contents:
git show df5a711To recover the original commit state:
git reset --hard df5a711To verify the recovery:
# Check the log
git log -n 1 --oneline

# Check the contents of the bugfix file
cat bugfix.txt👍.
After recovering the original commit, you might also want to preserve the amended version. Here’s how to do that:
1. First, ensure you’re on the recovered original commit:
git log -n 1 --onelineYou should see the original commit message: “Fix critical bug in login system”
2. Find the SHA-1 hash for the amended commit.
git reflogYou should see entries like:
df5a711 (HEAD -> main) HEAD@{0}: reset: moving to df5a711
8099486 HEAD@{1}: commit (amend): Add comment to critical bug fix
df5a711 (HEAD -> main) HEAD@{2}: commit: Fix critical bug in login systemLook for commit (amend) and the commit message that was added to the amended commit. In this example, it’s 8099486.
3. Now, let’s create a new branch with the amended commit:
git branch amended-fix 8099486Here’s what this command does:
git branchis the command to create a new branchamended-fixis the name we’re giving to the new branch8099486is the SHA-1 hash of the amended commit (use the actual hash from your reflog)
4. Verify that the new branch was created:
git branch5. To see the difference between these branches:
git log main..amended-fix --onelineThis will show you the commits in amended-fix but not in main.
6. You can switch to the amended-fix branch to verify its contents:
git checkout amended-fix
cat bugfix.txt
git log -n 1 --onelineYou should see the amended commit message and the additional comment in the file.
This approach allows you to keep both commit versions and choose which one to use or merge later.
In the next section, we’ll look at how reflog can help recover from a mistaken interactive rebase.
Recovering from a Mistaken Interactive Rebase (Squashing commits)
Interactive rebase (git rebase -i) is commonly used to clean up commit history. However, it’s easy to make mistakes that can unintentionally alter your commit history.
Let’s simulate a scenario where an interactive rebase goes wrong:
# Let's switch back to main branch
git switch main

# Create a series of commits
echo "First feature" >> feature.txt
git add feature.txt
git commit -m "Implement first part of feature"

echo "Second feature" >> feature.txt
git add feature.txt
git commit -m "Implement second part of feature"

echo "Third feature" >> feature.txt
git add feature.txt
git commit -m "Implement third part of feature"

# Check our commit history
git log --oneline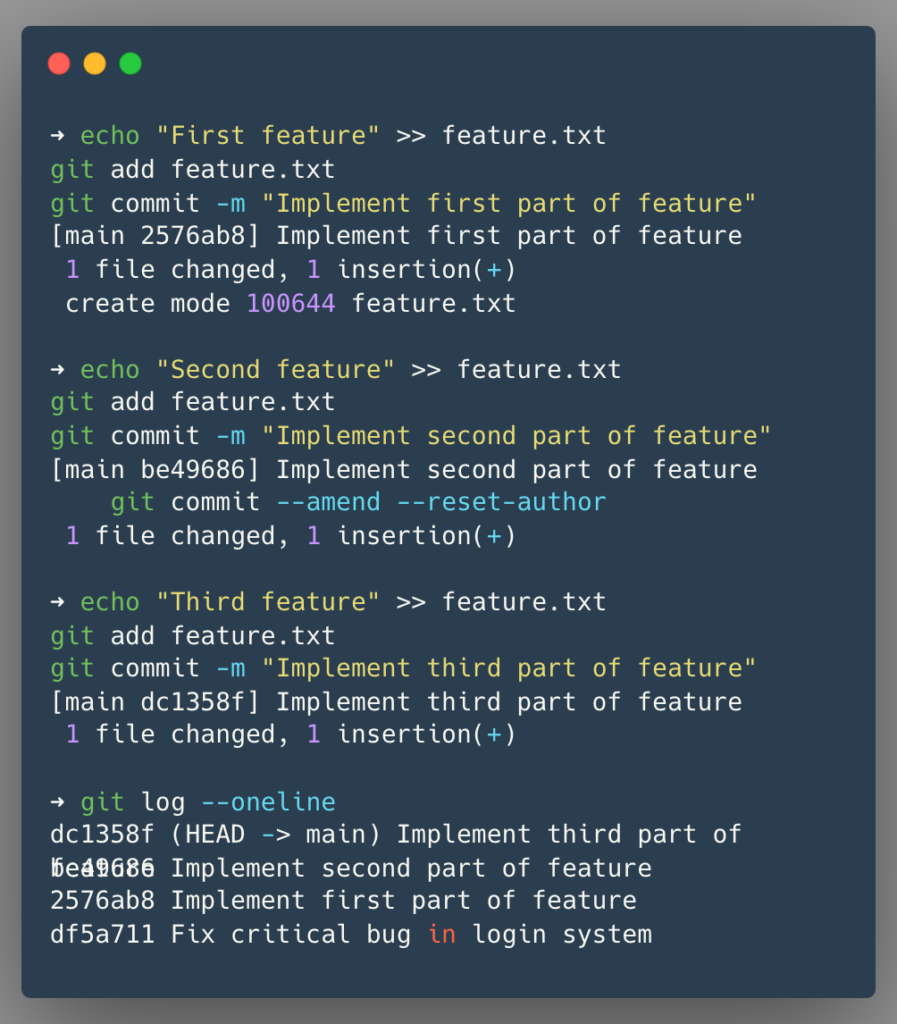
Now, let’s perform an interactive rebase to squash these two commits:
# Start an interactive rebase
git rebase -i HEAD~2In the interactive rebase editor, change the second commit from “pick” to “squash” or “s”, then save and close the editor.
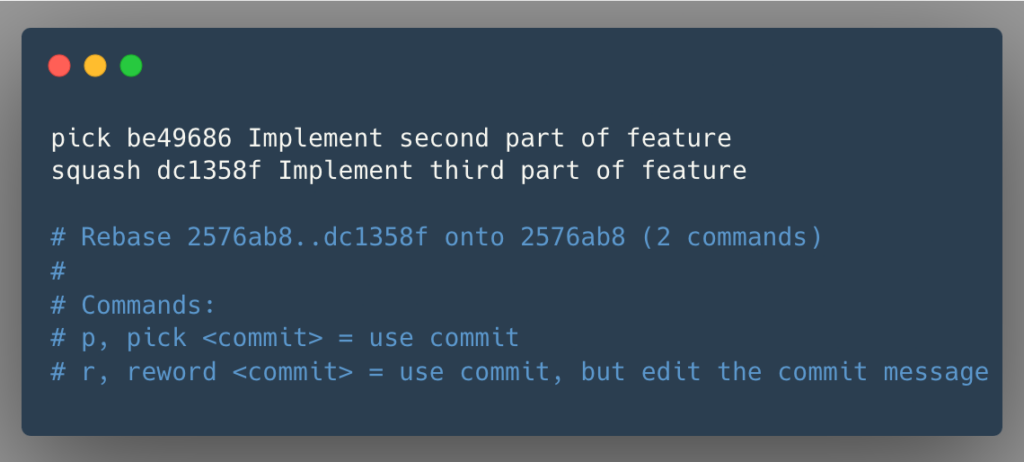
In the commit message editor, combine the commit messages and save.
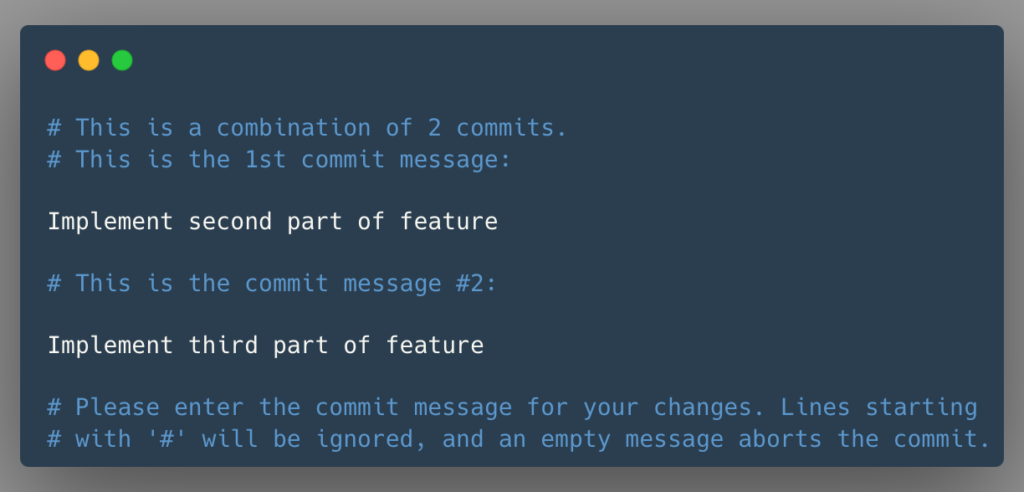
After the rebase, check the log:
git log -n 1You’ll see a single commit with both changes.
Let’s say you realize this squash was a mistake – you needed these commits separate for proper code review. Here’s how to use reflog to undo this operation:
git reflog -n 6You’ll see entries like:
a5e1f2b (HEAD -> main) HEAD@{0}: rebase (finish): returning to refs/heads/main
a5e1f2b (HEAD -> main) HEAD@{1}: rebase (squash): Implement second part of feature
be49686 HEAD@{2}: rebase (start): checkout HEAD~2
dc1358f HEAD@{3}: commit: Implement third part of feature
be49686 HEAD@{4}: commit: Implement second part of feature
2576ab8 HEAD@{5}: commit: Implement first part of featureTo undo the rebase and recover the original commits:
- Find the entry just before “rebase (start)” – this is the state before the rebase began.
- Note the corresponding SHA-1 hash (in this case,
dc1358f)
Now, reset to this commit:
git reset --hard dc1358fTo verify the recovery:
# Check the log
git log --oneline -n 2

# Check the contents of the feature file
cat feature.txtYour reflog will update to show this recovery operation:
git reflog -n 3You’ll see a new entry at the top, like:
dc1358f (HEAD -> main) HEAD@{0}: reset: moving to dc1358f
a5e1f2b HEAD@{1}: rebase (finish): returning to refs/heads/main
a5e1f2b HEAD@{2}: rebase (squash): Implement second part of featureThis recovery process moves your branch pointer back to the state before the rebase, effectively undoing the squash operation. The squashed commit isn’t lost; it’s still in your reflog and can be accessed.
In the next section, we’ll explore how reflog can help recover from an accidental remote branch merge.
Recovering from an Accidental Remote Branch Merge
Having local and remote versions of the same feature branch is common when working with a team.
Let’s simulate a scenario where you prematurely merge the remote feature branch into your local feature branch.
# Create and switch to a new feature branch
git checkout -b feature-user-auth

# Make a local change
echo "Local user authentication implementation" >> auth.txt
git add auth.txt
git commit -m "Implement local user authentication"

# Simulate a remote change (in real life, this would be on the remote repository)
git checkout -b origin/feature-user-auth
echo "Remote password reset functionality" >> password_reset.txt
git add password_reset.txt
git commit -m "Add password reset feature"

# Switch back to local feature branch
git checkout feature-user-auth

# Accidentally merge the remote branch
git merge origin/feature-user-authNow, let’s say you realize this merge was a bad choice. Your local branch now has changes you’re not ready to incorporate.
Here’s how to use reflog to undo this merge:
git reflog -n 3You’ll see entries like:
6e141f4 (HEAD -> feature-user-auth, origin/feature-user-auth) HEAD@{0}: merge origin/feature-user-auth: Fast-forward
b8ec320 HEAD@{1}: checkout: moving from origin/feature-user-auth to feature-user-auth
6e141f4 (HEAD -> feature-user-auth, origin/feature-user-auth) HEAD@{2}: commit: Add password reset featureTo undo the merge:
- Find the entry just before the merge – in this case, it’s the “moving from origin/feature-user-auth to feature-user-auth” checkout.
- Note the corresponding SHA-1 hash (in this case,
b8ec320ORHEAD@{1})
Now, reset to this commit:
git reset --hard b8ec320

# OR

git reset --hard HEAD@{1}To verify the recovery:
# Check the log
git log --oneline

# Check that the password_reset.txt file doesn't exist in your local branch
ls -lYour reflog will update to show this recovery operation:
git reflog -n 1You’ll see a new entry at the top, like:
b8ec320 (HEAD -> feature-user-auth) HEAD@{0}: reset: moving to HEAD@{1}Key points to remember:
- This method is best for undoing recent, local merges.
- If you’ve made commits after the accidental merge, resetting will remove those commits too. In such cases, consider creating a backup branch before resetting.
In the next section, we’ll explore how reflog can help recover from dropped stashes.
Recovering from an Accidental Stash Drop
Git’s stash feature allows you to temporarily store modified, tracked files. However, stash operations are not typically recorded in the main reflog. Instead, Git maintains a separate reflog for stashes.
Let’s see how to recover a dropped stash.
First, let’s set up our scenario:
# Let's switch back to main branch
git switch main

# Make some changes
echo "Work in progress" >> wip.txt
git add wip.txt

# Stash the changes
git stash save "Important WIP"

# Verify the stash
git stash list

# Drop the stash
git stash drop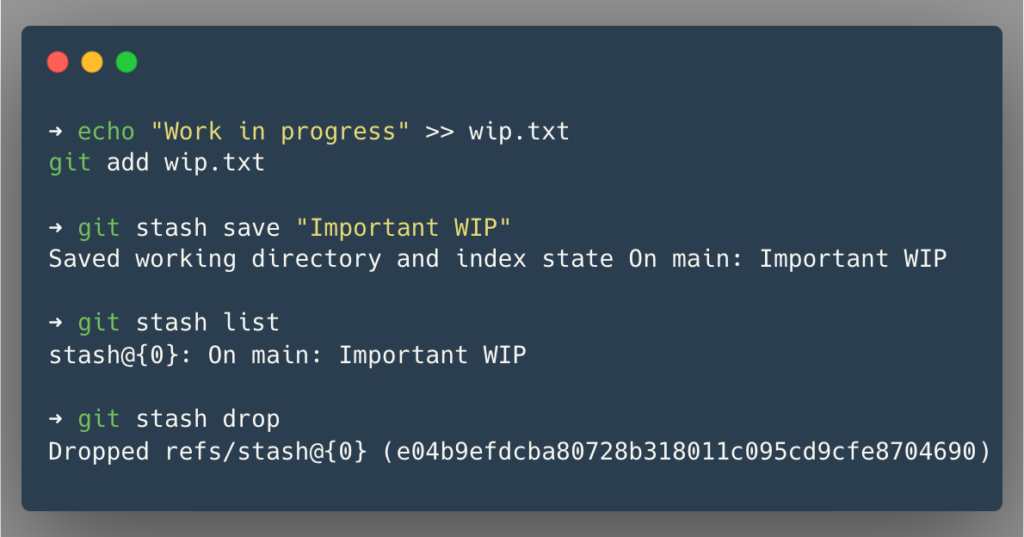
You realize you’ve just dropped a stash containing important work-in-progress changes.
Your first instinct might be to check the reflog:
git reflog -n 4However, you’ll notice no information about your dropped stash in the output. This is because stash operations are not recorded in the main reflog.
At this point, Git has another tool we can use: git fsck.
Git fsck (File System ChecK) is a utility for verifying the integrity of objects in your Git repository. It’s like a health check for your Git database. You can learn more about git fsck here.
Here’s how to use git fsck to recover the dropped stash:
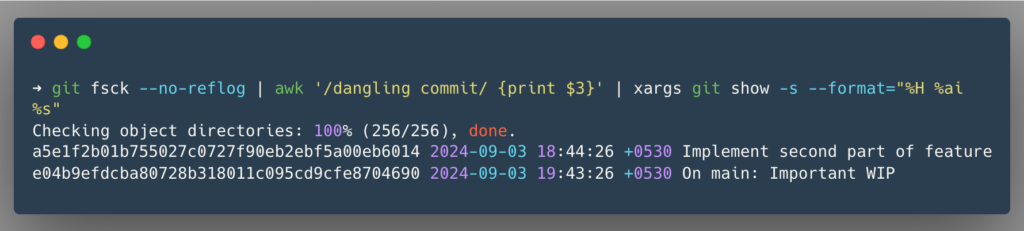
git fsck --no-reflog | awk '/dangling commit/ {print $3}'This will show a list of dangling commits, which includes dropped stashes.
This list of commits is not easily readable, so we can further pipe these hashes to git show command and pretty format it.
git fsck --no-reflog | awk '/dangling commit/ {print $3}' | xargs git show -s --format="%H %ai %s"This will give us the commit hash, date, and commit message, making it easier to identify your stash.
Look for a commit message that starts with “On <branch-name>: <your-stash-message>”. In this example, it’s a commit starting with the hash e04b9e.
Once you’ve identified the correct commit, you can verify the commit:
git show e04b9e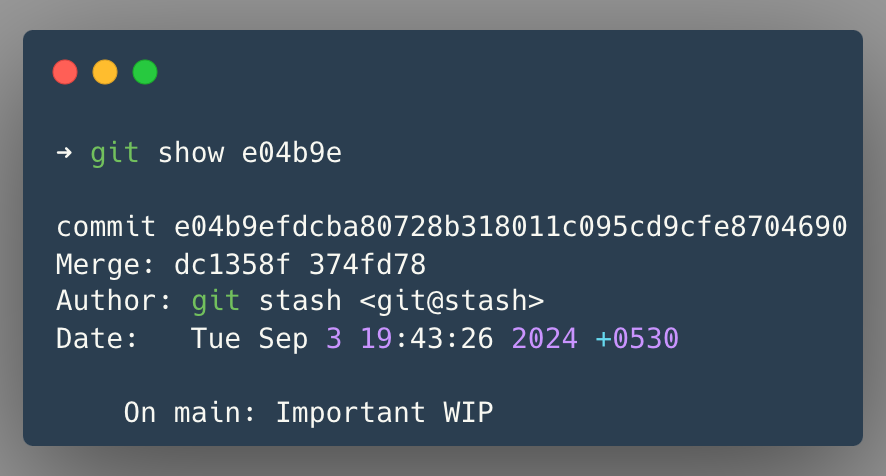
To recover the stash:
git stash apply e04b9eTo verify the recovery:
# Check the contents of the wip file
cat wip.txt

# Check git status
git statusYour working directory now contains the changes from the dropped stash.
If you want to recreate the stash instead of applying it directly:
git stash store -m "<stash-message>" <commit-hash>

# In this example this would be
git stash store -m "Recovered: Important WIP" e04b9eTo verify the recreated stash:
git stash listRemember, Git has multiple mechanisms for retaining and eventually removing unreferenced commits:
Reflog
- The reflog keeps track of reference updates, including when commits become unreferenced due to operations like
git resetorgit rebase. - By default, reflog entries are kept for 90 days.
- You can adjust the reflog expiration period using
git config gc.reflogExpire "60 days"or by passing--expire=2.weeks.agotogit reflog expire
Dangling Commits
- After a commit is no longer reachable from any reference or reflog entry, it becomes a dangling commit.
- Dangling commits are kept for an additional 30 days after the reflog expires.
- The default dangling commit retention period is 30 days, which can be changed using
git config gc.pruneExpire "30 days"
Garbage Collection
- The
git gccommand removes unreachable objects, including expired reflog entries and old dangling commits. git gcruns periodically when triggered by other Git commands or can be run manually.
Conclusion
Throughout this article, we’ve explored practical Git recovery techniques using git reflog and git fsck. Familiarity with these tools will save you from unexpected panic moments while using Git.
These recovery methods can save you hours of work and prevent data loss in many situations. But they aren’t a substitute for good Git practices.
To make the most of these recovery tools, I recommend:
- Frequently commit your changes.
- Be cautious with operations that alter history, such as force pushes or rebases on shared branches.
- Configuring extended retention periods for reflog entries and dangling objects if your project requires it.
Here’s a quick checklist of key points we covered:
- reflog is a local recovery tool. It can’t help with changes that were never in your local repository.
- For most recovery scenarios, use
git reflogto find the desired state, thengit reset --hardto that commit. - Stash operations aren’t in the main reflog. Use
git fsckto recover dropped stashes. - Git keeps dangling commits for a period, even after they’re unreachable. This gives you time to recover from mistakes.
- Familiarize yourself with reflog syntax (
HEAD@{n}) for more straightforward navigation of your repository’s history. - Set up a test repository to practice these techniques safely.
🙏 Thanks for your time and attention all the way through!
Let me know your thoughts/ questions in the comments below.
If this guide sparked a new idea,
a question, or desire to collaborate,
I’d love to hear from you:
🔗 Upwork
Till we meet again, keep making waves.🌊 🚀
Leave a Reply