Imagine trying to debug a misbehaving pod in your Kubernetes cluster. You’d typically reach for kubectl exec to inspect the container’s filesystem and its processes or diagnose network issues.
But if you are building container images correctly, you shouldn’t be able to do any of the above actions.
What do I mean by “building your container images correctly“? This means that your final image includes only your application and its dependencies and nothing else. No curl, ps, top or any tools that have nothing to do with your application running successfully.
But if the container has no tools other than the application itself, the debugging task can be a bit tricky. Kubernetes Combiner (v1.25) released the stable version of Ephemeral Containers to address these use cases.
In this article, we will learn about ephemeral containers and implement them using hands-on examples.
Here’s a quick summary for you.
Table of Contents
- Notes
- A Quick Demo
- Namespace Sharing
- Practical Examples
- Copying the Target Pod for Debugging
- Conclusion
Notes
Repository
- To follow the examples in this guide, clone the GitHub repository.
git clone https://github.com/decisivedevops/blog-resources.gitBuilding Docker Images
- All the examples have their respective Dockerfiles for container image creation.
- I am using a Kind cluster, so I will build the images locally and push them to the Kind cluster node.
- Due to this, a local image is used in
deployment.yaml. To ensure K8S does not pull the image from an upstream registry like Docker, I am configuringimagePullPolicy: Never. You can learn more aboutimagePullPolicyhere.
Terminal
- During demos, you can use a screen multiplexer such as Tmux to get a single-view layout for all the different
kubectlcommands. - You can also use multiple terminal windows/ panes.
A Quick Demo
Before we learn all the theories about ephemeral containers, let’s do a small practical demonstration of what they are.
First, cd into the project directory.
cd blog-resources/k8s/ephemeral-containersDockerfile:- The Dockerfile uses a multi-stage build to create a distroless image for a Python application. The first stage (builder) installs the application dependencies specified in the
requirements.txtfile. - The second stage (final distroless image) copies the installed dependencies and the Python application files from the builder stage and runs the
app.py.
- The Dockerfile uses a multi-stage build to create a distroless image for a Python application. The first stage (builder) installs the application dependencies specified in the
deployment.yaml:- The manifest defines a deployment for the ephemeral-containers application.
app.py:- The
app.pyfile contains a simple Python Flask application. It defines two routes: the root route (/) and the/healthzroute. - The root route returns the “Hello, World!” string with a status code 200. The
/healthzroute is a health check endpoint and returns the “Healthy” string with a status code 200. - The application is run using the Flask development server, listening on host ‘0.0.0.0’ and port 5000.
- The
Let’s apply the deployment and try to exec into the pod and check what we have.
kubectl apply -f deployment.yamlOnce the pod is running, exec into the pod.
> kubectl get pod -l app=ephemeral-containers

NAME                                   READY   STATUS    RESTARTS   AGE
ephemeral-containers-f8944b8b4-727dd   1/1     Running   0          17m

> POD=$(kubectl get pod -l app=ephemeral-containers -o jsonpath="{.items[0].metadata.name}")

> kubectl exec -it $POD -- shSo, in this distroless image gcr.io/distroless/python3 we do have the sh shell.
Let’s run some routine debugging commands.
# ps
sh: 1: ps: not found
# curl
sh: 2: curl: not found
# apt
sh: 3: apt: not found
# yum
sh: 4: yum: not found
# apk
sh: 5: apk: not found
# top
sh: 6: top: not found
# date
sh: 7: date: not found
# ls
sh: 8: ls: not found
#
As you can see, besides the application running, this container contains no tools to help us debug the app.
So, how do we troubleshoot issues here? Ephemeral containers can help. Let’s see a quick demo of them.
To attach an ephemeral container to our app.py running pod, run the below command.
kubectl debug -it $(kubectl get pod -l app=ephemeral-containers -o jsonpath="{.items[0].metadata.name}") --image nicolaka/netshoot --target ephemeral-containerskubectl debug: This is the main command to start a debugging session.
-it: These flags specify that the session should be interactive (-i) and allocate a TTY (-t).
$(kubectl get pod -l app=ephemeral-containers -o jsonpath="{.items[0].metadata.name}"): This subcommand retrieves the name of the first pod that matches the label selector app=ephemeral-containers. The jsonpath flag extracts the pod name from the JSON output.
--image nicolaka/netshoot: This flag specifies the container image to be used for the ephemeral container. In this case, it uses the nicolaka/netshoot image, which is a container image packed with networking troubleshooting tools. https://github.com/nicolaka/netshoot
--target ephemeral-containers: This flag specifies the name of the target container in the pod where the ephemeral container will be attached. It indicates that the ephemeral container should be attached to the container named ephemeral-containers.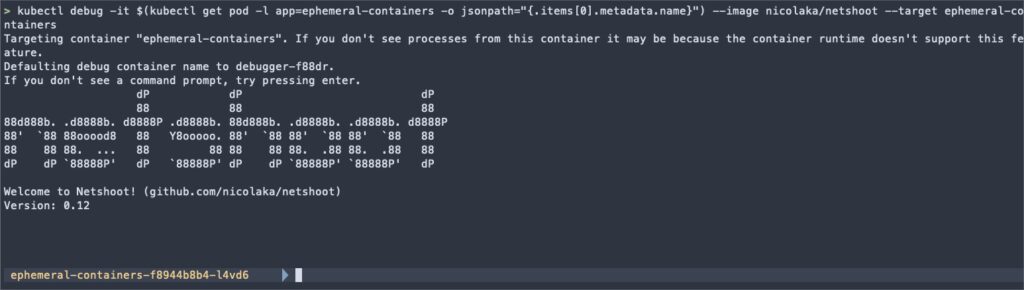
Once we get netshoot container shell, we can run commands like ps and netstat to confirm that we can access the processes from the app.py container.
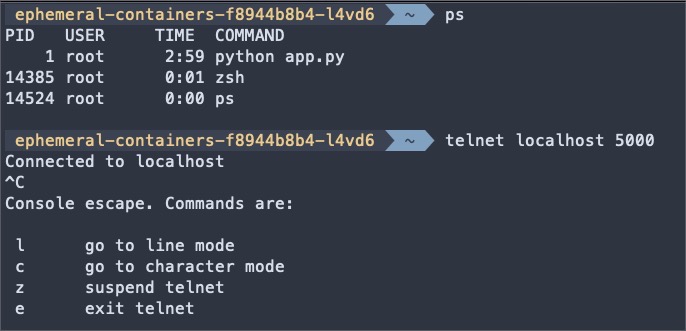
In the next section, we will learn how the netshoot container accessed the app.py and successfully ran telnet on localhost 5000, i.e. app.py port.
Namespace Sharing
Before learning about ephemeral containers, let’s step back and understand how containers leverage Linux namespaces.
Linux Namespaces
Linux namespaces are a fundamental concept in containerization. They provide a way to isolate and virtualize system resources, allowing processes to have an isolated view of the system. Each namespace wraps a specific global system resource and provides processes within that namespace with its instance of that resource.
Think of namespaces as partitioning system resources into separate, isolated environments. Each namespace creates a distinct scope for the resources it controls, and processes within it can only see and interact with those resources.
There are several types of namespaces in Linux, including:
- PID (Process ID) Namespace: Isolates the process ID space.
- Network Namespace: Isolates network resources, such as network interfaces and ports.
- IPC (Inter-Process Communication) Namespace: Isolates communication channels between processes.
- Mount Namespace: Isolates the filesystem mount points.
- UTS (Unix Timesharing System) Namespace: Isolates the hostname and domain name.
- User Namespace: Isolates user and group IDs.
Containers and Namespace
Containers are lightweight, isolated environments that encapsulate an application and its dependencies. They leverage Linux namespaces to achieve this isolation. Each container runs in its own set of namespaces, providing a separate environment for the container’s processes.
When a container is created, it is assigned its own set of namespaces. This allows the container to have its own isolated process tree, network stack, and filesystem, independent of other containers and the host system. Containers can only see and interact with the resources within their namespaces.
Namespace Sharing in Ephemeral Containers
Ephemeral containers are a special type of container created within the context of an existing pod. They are used for debugging and troubleshooting purposes. One key feature of ephemeral containers is their ability to share certain namespaces with the target container.
By sharing namespaces, ephemeral containers gain visibility and access to the resources and state of the target container. This enables powerful debugging and inspection capabilities, as the ephemeral container can interact with the target container’s processes, network, and filesystem.
Practical Examples
The following sections explore important shared namespaces and provide practical examples in ephemeral containers.
We will use a nicolaka/netshoot container to test these examples.
# target container
> kubectl run ns-debug-demo --rm -i --tty --image nicolaka/netshoot

# ephemeral container
> kubectl debug -it ns-debug-demo --image nicolaka/netshoot --target ns-debug-demoIPC Namespace
The IPC (Inter-Process Communication) namespace isolates communication channels between processes, such as message queues and shared memory. Ephemeral containers can interact with the target container’s IPC mechanisms by sharing the IPC namespace.
Example:
# Inside the target container
$ ipcmk -Q
Message queue id: 0


# Inside the ephemeral container
$ ipcs -q
------ Message Queues --------
key        msqid      owner      perms      used-bytes   messages
0xd0d56eb2 0 root 644 0 0In this example, the ephemeral container can access the message queue created in the target container, allowing inspection and interaction with IPC resources.
Network Namespace
The network namespace isolates network resources, such as interfaces, IP addresses, and ports. Ephemeral containers share the network namespace with the target container, enabling them to access the same network stack.
Example:
# Inside the target container
$ nc -l -p 8080 &

[1] 42

# Inside the ephemeral container
$ netstat -tuln

Active Internet connections (only servers)
Proto Recv-Q Send-Q Local Address           Foreign Address         State
tcp        0      0 0.0.0.0:8080            0.0.0.0:*               LISTEN
Here, the ephemeral container can interact with the network resources of the target container, such as connecting to a listening port and inspecting network connections.
PID Namespace
The PID (Process ID) namespace isolates the process ID space, allowing processes to have independent PID numbers. Sharing the PID namespace enables ephemeral containers to view and interact with the processes of the target container.
Example:
# Inside the target container
$ sleep 60


# Inside the ephemeral container
$ ps aux

PID   USER     TIME  COMMAND
    1 root      0:00 zsh
   64 root      0:00 zsh
  161 root      0:00 nc -l -p 8080
  173 root      0:00 sleep 60
176 root 0:00 ps auxThe ephemeral container can view the processes running in the target container, retrieve their PIDs, and monitor their resource usage using tools like ps, pgrep, and top.
Filesystem
Although ephemeral containers do not share the filesystem namespace with the target container, they can still access the target container’s filesystem through the /proc filesystem.
Example:
# Inside the target container
$ touch /tmp/testing-filesystem-ns


# Inside the ephemeral container
$ ls /proc/1/root/tmpBy accessing /proc/1/root (assuming PID 1 belongs to the target container), the ephemeral container can explore the target container’s filesystem, read files, and perform necessary diagnostics.
Copying the Target Pod for Debugging
While attaching ephemeral containers to a running pod is a common debugging approach, kubectl debug offers an additional feature that allows you to create a copy of the target pod specifically for debugging purposes.
The --copy-to flag in kubectl debug creates a new replica of the target pod with a specified name. When this flag is used, kubectl debug generates a copy of the original pod, including its containers, volumes, and configurations.
The copied pod acts as a standalone entity, separate from the production workload, allowing you to attach ephemeral containers and perform debugging without affecting the live environment.
Also, this copy pod is not labeled similarly to the target pod, so the upstream service will not serve traffic to it.
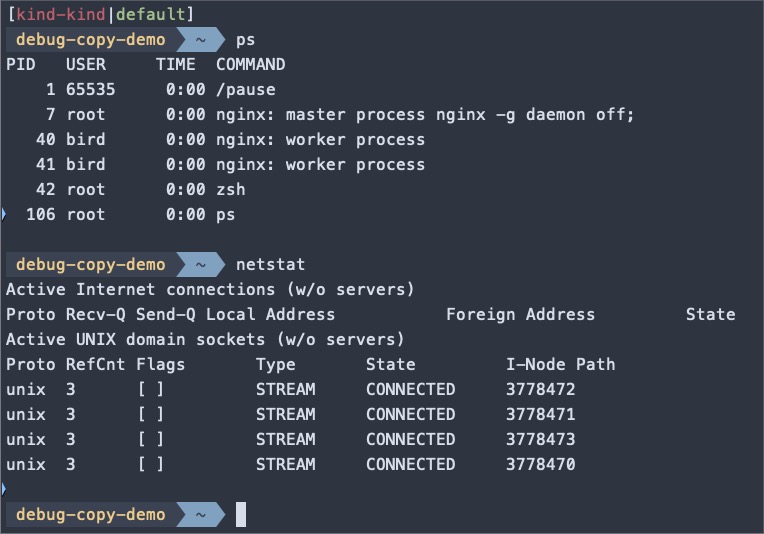
Here’s an example that demonstrates how to create a debug copy of a pod:
# target container
> kubectl run copy-demo --image nginx

# debug copy
> kubectl debug -it -c debugger --image nicolaka/netshoot \
  --copy-to debug-copy-demo \
  --share-processes \
copy-demoIn this example, kubectl debug is invoked with the --copy-to debug-copy-demo flag, creating a new pod named debug replica of the original pod specified by copy-demo. The --share-processes flag also enables process namespace sharing, allowing visibility into all the processes running within the pod.
Once inside the debug copy of the pod, you can run various debugging commands and tools to investigate issues. For example, you can use ps aux to inspect the process tree, ls to explore the filesystem or netstat to examine network connections.
Creating a copy of the pod for debugging gives you:
- Isolation: By debugging on a pod copy, you can investigate issues without interfering with the production traffic or risking unintended side effects. This isolation ensures that your debugging activities don’t impact the live application.
- State preservation: The copied pod retains the same state as the original pod at creation time. This means you can examine the pod’s state, including its filesystem and running processes, in a controlled and reproducible environment.
Conclusion
Ephemeral containers provide a powerful and efficient way to debug and troubleshoot issues in Kubernetes pods. Ephemeral containers can attach temporary containers with debugging tools to running pods, enabling you to inspect the container’s filesystem, processes, and network without modifying the original pod definition.
This article explored the concept of ephemeral containers, demonstrated their usage through practical examples, and discussed advanced techniques and best practices. We covered the underlying mechanisms, such as namespace sharing, that make ephemeral containers useful for debugging.
We also introduced the --copy-to flag for creating debug copies of pods, providing isolation, and preserving state during debugging sessions.